How to Fix Faded Fence and Deck Stains
If your fence or deck has lost its rich tone and looks tired, you’re not alone. Sun, rain, and foot traffic gradually wash out pigment and dull the protective finish. The good news: with the right process, you can revive color, enhance grain, and restore long-lasting protection without guesswork. This guide walks you through proven fading stain repair methods, clear re-staining steps, and practical wood care tips so your outdoor wood looks better and lasts longer.
Why Fence and Deck Stains Fade
Understanding the “why” behind fading helps you choose the right fix instead of a quick cover-up. Common culprits include:
- UV exposure: Sunlight breaks down pigments and binders, causing color loss and surface degradation.
- Moisture cycles: Rain, dew, and sprinklers swell and shrink wood, wearing away stain and opening pathways for water.
- Mildew and surface grime: Organic growth and dirt make finishes look patchy and can trap moisture.
- High traffic and abrasion: Deck boards see shoe wear, furniture movement, and pets, which scuff pigment faster.
- Application errors: Over-application, poor prep, or staining damp wood can lead to uneven absorption and premature failure.
Proper wood care begins with diagnosing whether your finish is just lightened and dry (ideal for a maintenance coat) or if it’s peeling and blotchy (which usually demands stripping and a full reset).
Tools and Materials for Fading Stain Repair
Gather smart, surface-safe tools before you start:
- Oxygenated cleaner (sodium percarbonate) and a quality deck cleaner/surfactant
- Stain stripper (for failing or film-forming finishes)
- Wood brightener/neutralizer (oxalic or citric acid)
- Pump sprayer, stiff-bristle deck brush, and scrub pads
- Pressure washer with a fan tip (500–800 PSI for softwoods; up to 1,200 PSI for dense hardwoods)
- Random-orbit sander with 60–100 grit discs/pads; sanding pole for rail caps
- Moisture meter (target 12–15% moisture before staining)
- Quality semi-transparent or solid stain (compatible with existing coating)
- Brushes, stain pads, or an airless/pump sprayer for application and back-brushing
- Drop cloths, plastic, and plant covers; gloves, goggles, and respirator as needed
Having the right setup streamlines fading stain repair, reduces rework, and protects surrounding landscaping and hardscapes.
Re-Staining Steps: A Complete, Practical Guide
Follow these re-staining steps end to end for predictable, professional-looking results.
1) Inspect, test, and plan
Sprinkle water on several boards and fence pickets. If water soaks in within a minute, a maintenance coat may suffice. If it beads strongly or the surface shows peeling or heavy blotches, plan to strip and start fresh. Note high-wear zones (steps, gate latches, rail caps) that may need extra attention.
2) Clean to remove grime, mildew, and graying
Apply an oxygenated cleaner with a pump sprayer. Let it dwell per label (typically 10–15 minutes), then scrub and rinse. Use a pressure washer conservatively with a wide fan tip, keeping the wand moving with the grain to avoid furring. Avoid chlorine bleach; it can damage wood fibers and corrode fasteners.
3) Strip failing or incompatible finishes
If the old stain is a film-former (peeling, flaking) or incompatible with your new product, use a stain stripper. Work in manageable sections, keep the surface wet while the stripper acts, and agitate stubborn spots with a brush. Rinse thoroughly. For tough films, a second pass or heat-assisted scraping may be needed.
4) Brighten and neutralize the wood
After cleaning or stripping, apply a wood brightener (oxalic acid) to restore color, remove tannin/iron stains, and neutralize high pH from strippers. This step evens out the surface for uniform stain absorption—crucial for a consistent finish.
5) Let the wood dry and sand selectively
Allow 24–48 hours of dry weather, then verify moisture with a meter (aim for 12–15%). Lightly sand fuzzed grain and problem spots. Use 80–100 grit on softwoods (cedar, pine) and 60–80 on dense hardwoods (ipe, mahogany). Avoid polishing above 120 grit, which can close pores and reduce penetration.
6) Choose the right stain and color
Match the product to your goal and existing coating:
- Penetrating, semi-transparent stains highlight grain and are great for maintenance cycles.
- Solid stains hide discoloration and offer strong UV protection but behave more like paint; they require thorough prep.
- Oil-based vs. water-based: Oils penetrate well and are forgiving to apply; quality water-based options cure tougher and are lower in VOCs. Ensure compatibility with what’s on the wood now.
Always sample in an inconspicuous area and view in full sun and shade. For noticeable fade, a slightly deeper tone often blends the old and new better than trying to match a light, heavily weathered hue.
7) Apply stain correctly
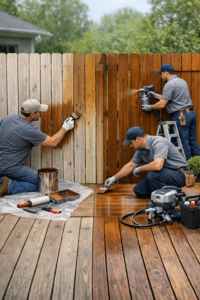
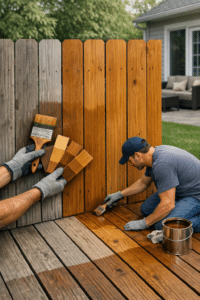
Work in the shade or during cooler parts of the day. Stir thoroughly to suspend pigments—don’t shake. Apply thin, even coats and back-brush to drive the stain into the grain and eliminate lap marks. Maintain a wet edge, finishing one board or section end-to-end before moving on. Most penetrating stains perform best with one saturated coat or two light coats applied “wet on damp” per manufacturer instructions.
8) Cure and protect
Respect dry times and keep the surface free of dew or rain for at least 24 hours (longer for cool, humid weather). Block off traffic on decks for 24–48 hours. Reinstall furniture with felt pads to minimize early abrasion.
Choosing Products for Long-Lasting Wood Care
Durability starts with product choice and compatibility. For ongoing wood care and easier future maintenance:
- Stick with penetrating, non-film-forming stains when possible so you can clean and recoat without aggressive stripping.
- Look for UV-rich semi-transparents with high-quality transoxide pigments for superior fade resistance.
- Consider regional climate: high sun exposure benefits from darker tones; damp, shaded sites need mildewcide-rich formulas.
- Check VOC rules in your area and opt for low-VOC lines if required.
When in doubt, contact the stain maker with your substrate, previous coating, and condition; they can confirm compatibility and ideal recoat windows.
Application Tips to Avoid Lap Marks and Blotchiness
- Prep is everything: Uniform porosity from cleaning, brightening, and drying yields uniform color.
- Control the weather window: Aim for 50–90°F, low wind, and no direct midday sun. Avoid staining if rain is likely within 24–48 hours.
- Work small, finish complete: Do full-length boards and full panels to maintain a wet edge.
- Thin, not thick: Over-application leads to sticky, glossy patches that attract dirt.
- Back-brush immediately: Especially on vertical fence pickets and railings to even out runs and drips.
- Treat end grain: It’s the thirstiest part; pre-wet with stain to reduce dark “halo” rings and water wicking.
Maintenance and Wood Care After Re-Staining
Extending the life of your beautiful finish comes down to consistent, simple wood care:
- Gentle washes: Rinse seasonally and clean annually with a mild wood cleaner. Avoid harsh bleach and high PSI.
- Fast fixes: Touch up scuffs on steps and rail caps before UV and water exploit bare fibers.
- Maintenance coats: Expect to refresh penetrating stains every 12–36 months depending on sun and traffic. With good prep, this is a clean-and-recoat—not a full strip.
- Landscape awareness: Redirect sprinklers; prune shrubs to improve airflow and drying.
These habits keep color lively and surfaces protected, minimizing future fading stain repair work.
Troubleshooting Common Issues
- Sticky or shiny patches: Usually over-application or staining before wood was dry. Wipe with mineral spirits (for oil-based) or a manufacturer-recommended reducer, then let cure. Next time, go thinner.
- Lap marks: Caused by drying between passes. Re-dampen edges and back-brush, or spot-sand and touch up.
- Blotchy color: Inconsistent porosity or incomplete brightening. A maintenance coat can even it out; severe cases may require a light resand and recoat.
- Peeling: Sign of a film-forming product or trapped moisture. Strip, brighten, dry thoroughly, and switch to a penetrating stain.
- Mildew returns quickly: Improve sun exposure and airflow, and choose a stain with stronger mildewcides.
Safety, Weather, and Environmental Tips
- Protect plants and surfaces: Pre-wet foliage, cover delicate plantings, and rinse thoroughly after chemical use.
- PPE matters: Wear gloves, goggles, and a respirator when handling cleaners, strippers, and stains.
- Mind oily rags: Oil-soaked rags can spontaneously combust. Dry flat outdoors before disposal per local code.
- Check conditions: Confirm temperature, humidity, and dew point. Morning shade and late afternoon sessions reduce flash-drying.