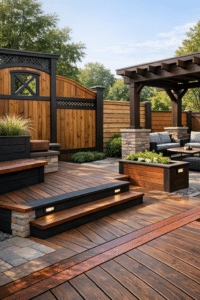
Preventing Stain Peeling and Flaking on Your Fence and Deck
You spent time and money staining your fence or deck, only to find it peeling or flaking months later. The good news: most failures are avoidable. With the right preparation, smart product selection, and proper application, you can get a durable, beautiful finish that stands up to sun, rain, and foot traffic. This guide breaks down the most common peeling stain causes, offers proven prevention tips, and walks you through step-by-step best practices to make your next stain job last.
Why Stain Peels and Flakes: The Key Causes
Understanding peeling stain causes is the first step to stopping them. Most failures trace back to a few common issues:
1) Moisture trapped in wood: Stain won’t bond when wood is too wet, or when dew, rain, or irrigation hits during curing. Moisture trying to escape pushes the coating off, especially on horizontal deck boards. Target a wood moisture content under 15% before staining.
2) Inadequate surface prep: Dirt, mildew, gray UV-damaged fibers, and old loose stain block penetration and adhesion. New lumber can also have mill glaze—a slick surface that prevents stain from soaking in.
3) Wrong product for the surface: Film-forming solid stains or paints often fail on horizontal traffic areas. Decks typically perform best with penetrating finishes that don’t build a thick film. Fences can use semi-transparent or solid stains, but compatibility matters.
4) Over-application and puddling: Heavy coats dry into a shell that flakes. Penetrating stains should be applied thin and any excess wiped off or back-brushed within minutes.
5) Sun and weather extremes: UV breaks down lignin in wood and pigments in stain. Rapid heating/cooling cycles cause expansion and contraction that stress the coating, leading to cracking and peeling if the bond is weak.
6) Incompatible recoats: Applying a water-based acrylic over an oily, glossy, or contaminated surface—or vice versa—can cause adhesion failure. Always test for compatibility and remove failing layers.
7) Temperature, humidity, and dew point: Staining when it’s too cold, too hot, overly humid, or near the dew point slows or prevents proper curing. Aim for 50–90°F (10–32°C) with humidity below ~60%, and keep the surface at least 5°F (3°C) above the dew point.
8) Wood-specific issues: Cedar and redwood can bleed tannins that discolor or interfere with bonding. New pressure-treated lumber can be too wet to accept stain. Fastener corrosion can also stain and compromise the finish.
Evaluate Your Fence and Deck Before You Start
Inspection helps you choose the right path—simple cleaning and recoat or full removal and restart.
Identify the existing finish: Is it transparent, semi-transparent, or solid? Oil- or water-based? Rub with a rag dampened with mineral spirits (oil may soften) or mild detergent and water (water-based may soften). If the current coat is peeling in sheets, you’ll likely need to strip.
Check moisture: A pin-type moisture meter is best. If you don’t have one, sprinkle water. If it beads heavily and doesn’t absorb within a few minutes, the wood likely isn’t ready to accept a new penetrating stain.
Adhesion test: Crosshatch a small area with a utility knife, press on painter’s tape, and pull. If coating lifts easily, plan to strip and sand.
Preparation: The Foundation of Long-Lasting Results
Thorough prep is your most powerful set of prevention tips against peeling and flaking.
Clean Deeply
Remove dirt, gray fiber, mildew, and contaminants. Oxygenated cleaners (sodium percarbonate) are effective and plant-friendly when used correctly. For stubborn mildew or algae, a diluted bleach solution (sodium hypochlorite) with detergent can help—rinse thoroughly and protect nearby vegetation.
Strip Failing Coatings
If the old stain is peeling or thick, use a deck/fence stripper designed for the finish type. Follow dwell-time instructions and keep surfaces wet to prevent drying during the process. Scrape gently and rinse thoroughly.
Brighten and Neutralize
After stripping or using alkaline cleaners, restore pH and color with an oxalic or citric acid brightener. This step improves penetration and helps prevent uneven color—one of the most overlooked yet critical prevention tips.
Address Mill Glaze and Rough Fibers
Sand smooth-planed or glazed boards with 80-grit (decking) and 100–120-grit (rails and posts) to open the grain. Don’t over-sand to a furniture finish; slightly open grain promotes penetration. Vacuum and blow off dust.
Dry Time Matters
Let wood dry 24–72 hours after washing, depending on weather and airflow. Elevated or slatted structures dry faster than ground-level decks and privacy fences with minimal gaps.
Choose the Right Stain for the Job
Selecting a finish matched to your surface is another pillar of avoiding peeling stain causes.
Penetrating semi-transparent stains: Ideal for decks and a safe bet for fences. They soak in, highlight grain, and are less likely to form a peel-prone film. Many modern options are oil-modified waterborne formulas that combine penetration with fast dry and good UV resistance.
Solid-color acrylic stains: Provide maximum color and UV shielding on vertical fence boards. Use caution on decks; traffic and standing water can lead to premature peeling. If you choose a solid on horizontal surfaces, be meticulous with prep and proper application in thin coats.
Oil vs. water-based: Oils typically penetrate well and are easy to maintain by recoating. Water-based acrylics breathe better and resist mildew growth. Your climate, wood species, and maintenance preferences should guide you.
Pigment level: More pigment means better UV protection. Transparent finishes look beautiful at first but often require more frequent maintenance, especially on decks.
Timing and Weather: Set Yourself Up for Success
Even great prep and products can fail if conditions are wrong. These prevention tips help you pick the right window:
Temperature and humidity: Target 50–90°F (10–32°C), low to moderate humidity, and no rain in the 24–48 hours after application. Avoid full sun and hot surfaces—shade or follow the shade as the sun moves.
Dew point rule: Ensure the surface temperature stays at least 5°F (3°C) above the dew point before, during, and several hours after staining to prevent moisture from condensing on the surface.
Wind and dust: Light breeze is fine; strong wind can flash-dry the coating or blow debris onto wet surfaces. Work when air is calm and clean.
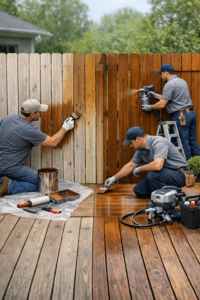
Proper Application: Techniques That Prevent Peeling
Application technique often separates a great job from a redo. Follow these proper application basics to keep stain bonded and beautiful.
Stir, Don’t Shake, and Box Your Cans
Stir thoroughly to re-disperse pigments. Combine multiple gallons (“boxing”) to ensure uniform color across large areas.
Use the Right Tools
Spray for speed, then immediately back-brush or back-roll to work stain into the grain and even out coverage. Quality natural-bristle brushes pair well with oils; synthetic works for water-based.
Thin, Even Coats
Penetrating stains typically perform best with one saturating coat applied to a thirsty surface, or two light “wet-on-wet” passes where the second is applied before the first fully dries. Avoid puddles and shiny spots—wipe or brush out excess within 5–10 minutes. For solid stains, apply two thin coats with full dry time between.
Maintain a Wet Edge
Work small sections from end to end boards or one to two fence panels at a time. This prevents lap marks and promotes consistent penetration.
Focus on End Grain and Cut Edges
End grain drinks up water and is a prime failure point. Saturate ends, post tops, and cut edges to reduce moisture wicking that can lead to flaking.
Coverage and Absorption
Expect lower coverage on rough-sawn fence boards and porous, weathered decking; higher on smooth or newer lumber. Follow the manufacturer’s spread rates, but let the wood’s absorption be your guide.
Special Considerations for Different Woods
Pressure-treated pine: Allow time for lumber to dry after installation. KDAT (kiln-dried after treatment) can be stained sooner, but still confirm moisture content.
Cedar and redwood: Gently clean and brighten; consider a stain designed for tannin-rich woods to minimize bleed-through. If using a solid stain on a fence, a tannin-blocking primer may help on trouble spots.
Exotic hardwoods (ipe, cumaru): Dense woods need specialty penetrating oils designed for hardwoods and very thin application to avoid surface film.
Ongoing Care: The Easiest Prevention Tip
The most cost-effective of all prevention tips is a simple maintenance routine that refreshes protection before failure begins.
Annual wash: Lightly clean in spring to remove pollen, dirt, and mildew. Avoid harsh pressure; use appropriate cleaners and soft brushing.
Water test: Sprinkle water. If it soaks in quickly instead of beading or darkens the wood immediately, it’s time to recoat horizontal surfaces.
Recoat cadence: Decks often need touch-ups every 12–24 months; fences may last 24–48 months depending on exposure, color depth, and product. Recoat before you see peeling—maintenance is easier than restoration.
Protect high-wear zones: Move planters and outdoor rugs regularly, use breathable mats, and keep sprinklers from soaking boards and fence panels.
Already Peeling? How to Fix It Right
If you’re facing flaking now, use a methodical approach:
1) Remove loose material: Scrape and brush away anything not firmly bonded.
2) Strip and clean: Apply a compatible stripper where needed, then rinse thoroughly. Follow with a brightener to neutralize and restore pH.
3) Sand selectively: