Fence and Deck Staining for New Construction vs Older Wood
Not all fences and decks are created equal—especially when it comes to age. Freshly built structures behave very differently from weathered ones, and the best results come from tailoring your staining approach to each. In this guide, you’ll learn smart, practical ways to assess the state of your wood, choose the right products, and apply them effectively. Along the way, we’ll highlight application differences you must know, share proven new wood stain tips, and walk through step-by-step old wood restoration strategies that bring tired surfaces back to life.
Why Age and Condition Matter
Wood is dynamic. Its porosity, surface texture, and moisture levels shift over time and with exposure. New boards are typically smoother, denser at the surface, and may still hold mill glaze or factory residues that resist stain penetration. Older wood, by contrast, is more open-pored due to UV exposure and weathering, which can improve absorption but also highlight defects and inconsistencies. Understanding these application differences helps you avoid blotching, premature failure, and color mismatch.
Beyond age, the condition of the wood is critical. Gray oxidation, mildew staining, existing coatings, and cupping or splintering all affect prep and product choice. A well-prepped surface—new or old—will accept stain evenly and last longer, protecting your investment and enhancing curb appeal.
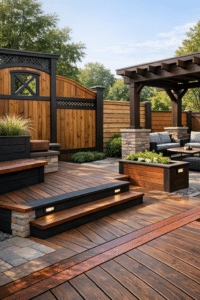
New Construction Wood: When and How to Stain
Assess Readiness Before You Start
One of the most overlooked new wood stain tips is to verify that the lumber is ready to accept stain. Pressure-treated pine often contains residual moisture and treatment chemicals, which can slow penetration. Many pros recommend waiting until the wood reaches roughly 12–15% moisture content. If you don’t have a meter, a quick “water bead” test can help: sprinkle water on the surface—if it beads up, wait; if it darkens and absorbs quickly, you’re closer to go-time.
Know your lumber type. Kiln-dried wood can often be stained sooner, while green or wet wood benefits from a seasoning period. Cedar and redwood may have extractives that call for diligent surface prep to ensure even color.
Prep New Wood to Improve Penetration
New boards often arrive with a slick mill glaze that prevents stain from soaking in. One of the best new wood stain tips is to lightly sand high-traffic or horizontal surfaces with 80–120 grit to knock down glaze and raised grain. Follow with a dedicated wood cleaner to remove dust, dirt, and residues, then rinse thoroughly. A brightener step (often oxalic acid-based) can further balance pH and open the pores for uniform color.
Focus on details: sand or wipe knots, clean end grain, and ensure railings and edges are free of handling grime. Allow the wood to dry completely after washing before you stain.
Choose the Right Stain for Fresh Lumber
For new decks and fences, penetrating semi-transparent or transparent stains typically perform best because they soak into the fibers without forming a heavy film. These products move with the wood as it expands and contracts. Oil-based formulas often deliver deeper penetration and rich color, while water-based versions offer low VOCs, easier cleanup, and color stability. Consider UV inhibitors and mildewcides for south- and west-facing exposures.
Plan for a single thin coat initially, especially on dense or newer boards. Heavy coats can skin over at the surface and peel later. Seal end grain to slow moisture wicking and reduce checking.
Application Differences on New Wood
With newer, smoother surfaces, aim for thin, even coats applied in the shade, ideally between 50–85°F with low humidity. Spraying followed by immediate back-brushing helps push stain into the grain and eliminates lap marks. Maintain a wet edge, and treat 2–3 boards at a time to keep color consistent. These application differences minimize blotching and ensure long-term adhesion.
Another of the key new wood stain tips: test color on an inconspicuous section first. New lumber can take stain lighter than expected; adjust your product or number of coats accordingly.
Common Mistakes to Avoid on New Builds
Don’t rush it. Staining too soon, over-applying, or skipping prep are the fastest ways to guarantee early failure. Avoid film-forming products that trap moisture. Clean hardware drips immediately, and protect adjacent masonry or siding from overspray.
Older Wood: Restore, Then Protect
Diagnose the Starting Point
Effective old wood restoration begins with an honest assessment. Is the surface gray with oxidation, speckled with mildew, or coated with a failing film? Is the wood fuzzy from prior pressure washing? Are there cupped, cracked, or rotten boards? Test absorption with a few water drops; older, more porous wood will usually drink stain quickly. Understanding these conditions guides the cleaning, stripping, and sanding steps that follow.
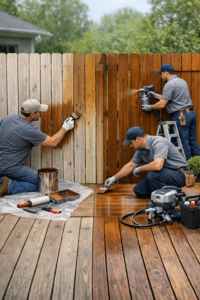
Step-by-Step Old Wood Restoration
Start with a cleaner designed for exterior wood. Oxygenated cleaners (sodium percarbonate) lift dirt, grayness, and organics without excessive harshness. If an existing stain is failing or too dark, a dedicated stripper may be necessary; follow manufacturer dwell times and safety guidance. After cleaning or stripping, use a brightener (often oxalic or citric acid-based) to neutralize pH, revive natural color, and enhance uniform absorption.
Use appropriate water pressure: for decks, 500–800 PSI with a fan tip is usually sufficient; for fences, 800–1200 PSI depending on species and condition. Keep the wand moving with the grain to avoid “tiger striping.” If fibers stand up, a light sanding pass after drying will smooth fuzz and help stains lay flat. Replace or secure fasteners, swap out boards that are beyond saving, and countersink protruding screws or nails before staining.
Product Selection for Weathered Surfaces
Older, more porous wood often benefits from semi-transparent or semi-solid penetrating stains that even out color while showcasing grain. If the previous finish was a solid-color acrylic, you’ll typically need to stay with a solid to ensure adhesion and coverage. Oil-based options can rejuvenate dry fibers, while water-based solids provide robust color uniformity and easier maintenance. For heavy tannins (cedar, redwood), consider products formulated to minimize bleed-through; if you switch to a solid color on severe discoloration, follow the product’s specific prep steps.
Application Differences on Older Wood
Expect thirsty boards. Plan for a “wet-on-wet” approach on horizontal surfaces: apply a first coat, allow it to penetrate, then follow promptly with a second light coat before the first fully cures, preventing surface glazing. Back-brush thoroughly to eliminate lap marks and ensure even saturation. These application differences improve depth and longevity on weathered lumber.
Watch your pace on hot days. Older decks can flash-dry unevenly. Work in manageable sections and maintain a consistent workflow across entire boards to avoid visible stop lines.
Safety and Environmental Considerations
Wear gloves, eye protection, and a respirator when using cleaners, strippers, or solvent-based products. Protect landscaping with plastic sheeting and pre-wet plants. Capture runoff when feasible, and follow local regulations on VOCs and chemical disposal. Patience and protection are essential parts of responsible old wood restoration.
Wood Species and Climate: Fine-Tuning Your Approach
Pine and pressure-treated lumber are common for decks and fences; they’re generally absorbent once seasoned, making penetrating stains a strong fit. Cedar and redwood are naturally rot-resistant but contain extractives that can affect color uniformity—thorough prep and testing are crucial. Dense hardwoods like ipe and mahogany require specialized, thin penetrating oils and often shorter dwell times; many benefit from lighter, more frequent maintenance coats.
Climate matters. In humid or shaded areas, prioritize products with strong mildewcides and schedule staining during longer dry windows. In hot, sunny regions, UV resistance and colorfastness become paramount. Freeze-thaw cycles call for flexible, non-film-forming finishes that won’t crack or peel. Adjusting your plan to these variables is another example of smart application differences.
Color, Sheen, and Testing
Color reads differently on new vs. old wood due to underlying tone and porosity. Always sample first. Transparent tones will look brighter on new wood and muted on gray, aged boards. Semi-transparent colors can bridge old and new sections when boards have been replaced. For mixed-age decks, you might blend products—transparent on new replacement boards and semi-transparent on older ones—to harmonize appearance, then recoat the whole surface with a unifying pass.
Maintenance Schedules and Expectations
Plan ahead for care. New construction often needs a lighter first coat and may require an earlier refresh (12–18 months) as the wood finishes seasoning. Older wood, once restored and saturated, can often hold color 18–36 months depending on exposure and product type. Inspect annually after winter or peak sun season, clean lightly to remove pollutants and pollen, and spot-recoat high-wear zones like steps and rail caps as needed.
Quick Comparison: New vs. Old at a Glance
New construction benefits from careful timing, light prep to remove mill glaze, and thin, penetrating coats that won’t trap moisture. Focus on even absorption and subtle color building. In contrast, old wood restoration centers on deep cleaning or stripping, brightening, targeted repairs, and potentially richer coats to fill thirsty fibers. The key application differences come down to readiness, porosity, and product choice.
Pro-Level New Wood Stain Tips and Old Wood Restoration FAQs
How long should I wait to stain pressure-treated lumber?
Allow it to dry to roughly 12–15% moisture. Depending on climate and season, this might take a few weeks to several months. Use a moisture meter or the water bead test to confirm readiness.
Can I put a semi-transparent stain over an old solid-color stain?
Not without removing the solid coating first. Semi-transparent stains must penetrate, and films block absorption. Either strip to bare wood or recoat with a compatible solid-color product.
What’s the best way to avoid lap marks?
Work in the shade, maintain a wet edge, stain full boards end-to-end, and back-brush immediately. On older wood, consider wet-on-wet passes for consistent saturation.
Oil-based or water-based?
Oil-based stains typically penetrate deeper and enrich grain, great for thirsty or older wood. Water-based stains offer lower odor, faster drying, and color stability. Match your choice to wood condition, climate, and maintenance preferences.
Tools and Materials Checklist
For success on both new and older projects, assemble the right kit: wood cleaner, brightener, or stripper (as needed); sanding tools (80–120 grit); brushes and stain pads for back-brushing; sprayer for speed on fences; moisture meter; plastic sheeting and drop cloths; PPE; and high-quality penetrating stain suited to your wood species and exposure.
Conclusion: Protect Your Investment with the Right Plan
Whether you’re finishing a just-built fence or reviving a weathered deck, the best results come from matching your approach to the wood’s age and condition. Use the new wood stain tips here to time your first coat perfectly, and rely on proven old wood restoration steps to clean, repair, and refinish aging surfaces. Adjust for climate and species, respect the crucial application differences, and