How to Seal Cracks and Gaps in Fences and Decks Before Staining
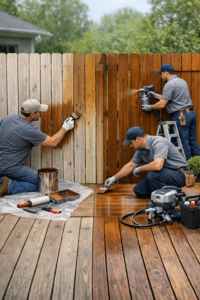
A great stain job starts long before you open the can. The secret is simple: address small flaws now so your stain lays smooth, bonds well, and protects longer. This guide walks you through practical stain prep for crack repair and gap sealing on fences and decks—so your wood looks better on day one and stays that way through the seasons.
Why Sealing Cracks and Gaps Matters Before Staining
Stain can’t fix damaged wood; it only highlights what’s already there. Sealing cracks and gaps before staining offers three big benefits:
1) Better appearance: Smooth, even surfaces absorb stain uniformly for a consistent color. Proper crack repair prevents dark streaks and blotchy patches that draw the eye to flaws.
2) Longer protection: Open gaps act like funnels that pull in water and debris. Thoughtful gap sealing keeps moisture out, limiting swelling, warping, and rot. That saves you time and money on maintenance.
3) Stronger bond: Clean, filled wood holds stain more reliably. Good stain prep minimizes premature peeling on film-forming finishes and improves penetration for penetrating stains.
Tools and Materials for Effective Crack Repair and Gap Sealing
Gather the right products so your repairs last outdoors:
Cleaning and prep: Exterior wood cleaner, deck/fence brightener (oxalic acid) to neutralize, stiff nylon brush, garden sprayer, hose or low-pressure rinse, drop cloths.
Repair materials: Exterior wood filler (stainable and sandable), two-part epoxy wood repair kit for deeper structural cracks, elastomeric/urethane hybrid sealant (paintable and stainable), backer rod for wide gaps, wood hardener for soft, punky areas.
Tools: Putty knives, caulk gun, utility knife, sanding block or sander (80–120 grit), countersink bit, driver/drill, moisture meter (optional but helpful).
Fasteners: Exterior-grade screws, galvanized or stainless nails for replacing or refastening boards.
Skip 100% silicone—it’s typically not stainable and can interfere with adhesion. Look for products labeled “paintable” and “stainable,” and choose exterior-grade formulas rated for horizontal or vertical use as needed.
Step-by-Step Stain Prep: Sealing Cracks and Gaps
1) Inspect the Entire Structure
Walk the deck and fence in good daylight. Mark trouble spots: hairline checks, splits at board ends, knot holes, loose fasteners, damaged pickets, open joints at rails and posts, and gaps between trim pieces. Note whether they’re on horizontal (deck surface, rail tops) or vertical (fence pickets, posts) areas—the solution differs.
2) Tighten and Replace Fasteners
Backed-out screws and nails create gaps and movement that defeat gap sealing. Refasten loose boards with exterior screws, countersinking slightly below the surface. Replace corroded hardware. Stable wood is essential before crack repair.
3) Clean Thoroughly
Stain sticks to clean wood, not to grime, mildew, or old fibers. Apply wood cleaner, scrub with a stiff brush, and rinse well. Use a brightener after cleaning to reset pH and open pores. If power washing, keep pressure low and use a wide fan tip to avoid furring the wood. Let it dry completely—typically 24–48 hours depending on weather.
4) Confirm Dryness
Repairs need dry wood. Use a moisture meter if available (ideally below 15–18% before filling and staining). If you don’t have one, wait for two clear, dry days after washing. Damp wood can trap moisture under repairs, undermining your stain prep.
5) Choose the Right Repair Method
Hairline surface checks: Often handled with a penetrating stain alone. If they create a rough feel, a light crack repair using a thin, stainable exterior filler can help on horizontal surfaces.
Moderate cracks (up to 1/4″): Fill with exterior wood filler on horizontal surfaces, or a stainable elastomeric sealant on vertical seams and joints. Tool smooth.
Wide gaps (over 1/4″): Press in a backer rod for depth control, then apply flexible, stainable sealant. This is ideal for fence post/rail joints and trim interfaces where movement occurs.
Deep structural splits: Consolidate soft wood with hardener, then rebuild using a two-part epoxy wood repair system. Sand flush.
6) Apply Filler or Sealant
Work clean. Press filler into cracks slightly proud of the surface to allow for sanding. For gap sealing with sealant, cut a proper nozzle angle and keep a steady bead; use a damp finger or tool to smooth. Remove smears immediately. Avoid caulking the drainage spaces between deck boards—those gaps must remain open for water to escape.
7) Let Repairs Cure Fully
Follow label cure times. Many fillers sand in 30–60 minutes, while sealants and epoxies may need 24–48 hours. Rushing this step can telegraph seams through the stain or lead to early failure—patience here pays off in long-term durability.
8) Sand and Final Clean
Lightly sand repairs and surrounding areas with 80–120 grit to level and feather edges. Vacuum or brush away dust, and wipe down with a clean, slightly damp cloth to remove fine particles. Now you’re ready to stain on a smooth, uniform surface.
Choosing the Right Products for Fences vs. Decks
Decks (horizontal surfaces): Use exterior wood filler or epoxy repair for surface cracks and holes; choose products rated for foot traffic and UV exposure. On deck tops, avoid soft, rubbery caulks—they can attract dirt and wear poorly. For large, deep splits, epoxy systems deliver the most durable crack repair; if a board is badly checked or compromised, replacement is often the best long-term solution.
Fences (vertical surfaces): Flexible, paintable/stainable elastomeric sealants excel at gap sealing around post-to-rail connections, trim joints, and knot holes. They accommodate seasonal movement without cracking. Use backer rod for gaps over 1/4″ to avoid wasting sealant and to keep the joint flexible.
Compatibility with stain: Match water-based fillers/sealants with water-based stain and solvent-based with oil-based when possible. Always choose “stainable” versions. Test on a scrap or hidden area to ensure color acceptance and adhesion—vital to proper stain prep.
Special Scenarios and Fixes
Hairline Checks Across Boards
Common in sun-exposed wood, these micro-cracks usually don’t require heavy crack repair. A penetrating, semi-transparent stain can bridge and protect. If the surface feels rough, skim with a stainable filler, sand smooth, and proceed.
Wide Gaps at Posts and Rails
Movement at structural joints invites water. Insert backer rod to set the right depth, then apply a high-quality, stainable elastomeric sealant. Tool cleanly, allow full cure, and then stain. This gap sealing step dramatically improves weather resistance.
Knot Holes and End Grain
Knot voids and cut ends soak up water and stain unevenly. Fill knot holes with exterior wood filler or epoxy. For ends of fence boards and decking, consider an end-grain sealer prior to staining; it minimizes moisture uptake and reduces future splitting.
Loose or Squeaky Boards
Movement will crack fillers. Refasten boards first, then complete your crack repair. On decks, replace fasteners with corrosion-resistant screws for a tighter, longer-lasting hold.
Splits at Board Ends
Small end splits can be stabilized with epoxy or replaced if severe. Avoid driving fasteners too close to ends—it encourages further splitting. After repair, sand flush and continue with stain prep.
Gaps Between Deck Boards
Do not seal drainage gaps between deck boards. Those spaces allow water and debris to escape. Sealing them traps moisture, accelerates rot, and creates maintenance headaches. Clean them out but leave them open.
Weather, Timing, and Curing for Successful Stain Prep
Temperature and humidity: Aim for 50–90°F with moderate humidity. Avoid working when temperatures are near the dew point or when overnight temps will drop sharply—condensation interferes with curing and staining.
Dry windows: You’ll need at least 24–48 hours of dry weather for cleaning, curing repairs, and staining. Check product labels for cure times and plan accordingly.
Pressure-treated wood: New PT lumber needs to dry before staining. Depending on climate and treatment, that may take several months. Use the water-drop test (water should absorb rather than bead) or a moisture meter to decide when to proceed with stain prep.
Common Mistakes to Avoid
Using silicone: Non-stainable silicones resist coatings and can cause adhesion failure. Stick to paintable, stainable sealants.
Overfilling on deck surfaces: Bulky beads or soft caulk on walking areas scuff and collect dirt. Keep repairs flush and durable with proper fillers or epoxies.
Skipping cleaning: Dirt and mildew block adhesion. Clean and brighten before any crack repair.
Ignoring movement: Rigid fillers in high-movement joints will crack. Use flexible gap sealing solutions where wood expands and contracts.
Rushing cure time: Staining over uncured repairs leads to color mismatch and early failure.
Quick Pre-Stain Checklist
Inspect: Mark cracks, splits, gaps, and loose fasteners on both fences and decks.
Clean and brighten: Remove grime and neutralize the wood to improve stain penetration.
Dry: Confirm moisture is within range; allow adequate dry time.
Repair: Select the right method—filler, sealant with backer rod, or epoxy—for each issue.
Sand: Smooth repairs and feather edges to blend invisibly.
Test: Check stain compatibility on a small area.
Stain: Apply once all gap sealing and crack repair are cured.
FAQs
Can I stain and fill on the same day? Usually no. Most fillers and sealants require at least several hours—and often 24–48 hours—to cure before staining. Always follow product guidance.
Will stain hide hairline cracks? Penetrating stains can reduce their visibility, but for rough textures, a light skim of stainable filler plus sanding gives a smoother finish during stain prep.
What’s the best product for large gaps? Use backer rod plus a paintable, stainable elastomeric sealant. This keeps the joint flexible and reduces sealant waste for long-lasting gap sealing.
Is wood putty the same as wood filler? No. Putty is generally for finished, interior applications and stays somewhat soft. Exterior wood filler and epoxy systems cure hard and are