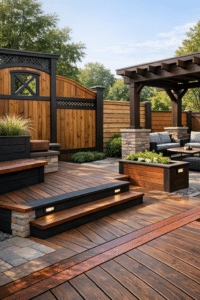
How to Clean Your Deck Before Staining
Before you open a can of stain, the most important step is thorough cleaning. A spotless, properly prepped surface helps stain penetrate evenly, prevents premature peeling, and keeps your deck looking great for seasons to come. In this guide, you’ll learn practical deck cleaning tips to tackle dirt, mold, and weathered wood, how to remove mildew safely, and the best practices to get your boards stain-ready without damaging the wood.
Why Cleaning Matters Before Staining
Stain needs a clean, receptive surface to bond and protect. Dust, pollen, old finishes, and biological growth can all interfere with absorption. Proper prep does three crucial things: it cleans away contaminants, opens the wood grain for even penetration, and restores the pH balance of the wood after alkaline cleaners so your finish cures correctly. Skipping these steps almost guarantees blotchy color and short-lived results.
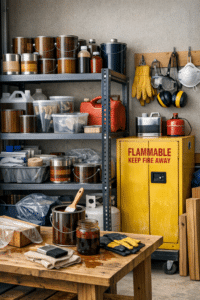
Tools and Materials You’ll Need
Safety first: Nitrile gloves, eye protection, and a respirator (if using strong chemicals). Work on a calm, overcast day to reduce quick drying.
Cleaning gear: Broom, leaf blower, or shop vac; pump sprayer; stiff-bristle deck brush on a pole; garden hose with a high-flow nozzle. If using a pressure washer, choose a wide fan tip (25–40°).
Cleaners: Oxygen bleach (sodium percarbonate) for general grime and organic stains; a diluted sodium hypochlorite solution for stubborn algae/mildew; a wood brightener/neutralizer (often oxalic or citric acid) to restore color and pH after cleaning.
Prep supplies: Plastic sheeting or tarps for plants; painter’s tape; bucket; sandpaper (80 grit for deck boards; 100–120 for rails); moisture meter (optional but recommended).
Plan the Timing
Check the forecast: You’ll need 24–48 hours of dry weather after washing so the deck can fully dry before staining. Avoid cleaning in direct sun that causes solutions to flash-dry.
Temperature sweet spot: Aim for 50–85°F. Extreme heat can bake on residue; cold temps slow cleaning action and drying.
Step-by-Step: Clean Your Deck for Stain-Ready Results
1) Clear and Protect the Area
Remove furniture, grills, rugs, and planters. Cover delicate landscaping with breathable tarps and pre-wet any plants near the deck so runoff doesn’t linger. Tape off metal fixtures and nearby siding if needed.
2) Dry Clean the Surface
Sweep or blow off leaves, soil, and loose debris. Pay attention to board gaps and stair treads where grit hides. The more dry debris you remove now, the less you’ll push into the wood during wet cleaning.
3) Pre-Wet the Wood
Lightly mist the deck with clean water. Pre-wetting prevents cleaners from soaking too deeply and helps them spread evenly. Don’t soak; a uniformly damp surface is ideal.
4) Choose the Right Cleaner for Your Deck
Oxygen bleach (sodium percarbonate): Excellent for general grime, graying from UV, and organic stains. It’s non-chlorinated and safer for plants when used as directed. Mix according to label and apply with a pump sprayer.
Sodium hypochlorite (household bleach) blend: For heavy biological growth, especially when you need to remove mildew and algae. Typical deck-safe mixes range from 1 part 6–8% bleach to 3–4 parts water, plus a small amount of mild surfactant (like a few drops of dish soap) to help it cling. Protect plants and rinse thoroughly afterward.
Pro deck cleaning tips: Always test in an inconspicuous spot; follow the manufacturer’s dilution and dwell times; never mix bleach with ammonia or acids.
5) Apply, Dwell, and Agitate
Spray the cleaner generously from the farthest corner back toward your exit. Allow 10–15 minutes of dwell time, keeping the surface damp so the solution remains active. Scrub with a stiff-bristle brush in the direction of the wood grain to lift stains without scarring the boards.
6) Rinse Methodically
Rinse top to bottom with a strong stream from a garden hose, working in sections until runoff is clear. If using a pressure washer, keep pressure conservative—generally 500–800 PSI for softwoods, up to 1,200 PSI for harder species—and always use a wide fan tip at least 12–18 inches from the surface. Move with the grain to prevent gouging or fuzzing the wood.
How to Remove Mildew and Algae Safely
Mildew appears as black or gray spotting; algae and moss often look green and slippery. To remove mildew, apply your chosen solution (oxygen bleach for light growth; a diluted sodium hypochlorite mix for stubborn colonies). Let it dwell 10–15 minutes, then scrub and rinse thoroughly. Stubborn areas may require a second application. Keep the deck damp—but not soaking—during dwell time for maximum effectiveness.
Bonus deck cleaning tips: Work in the shade to slow evaporation; treat railings, posts, and stair risers too; and always follow with a brightener if you’ve used an alkaline cleaner or bleach.
Brighten and Neutralize for Perfect Stain Absorption
After alkaline cleaning (including oxygen bleach or hypochlorite blends), wood fibers can darken and the surface pH rises—both of which can interfere with stain adhesion. A wood brightener/neutralizer, typically oxalic or citric acid, brings the pH back into balance and restores natural color.
How to use: With the deck still damp after rinsing, apply brightener per label directions. Let it dwell (usually 5–10 minutes) and rinse thoroughly. You’ll see the wood lighten and look more uniform—an ideal base for stain.
Drying, Sanding, and Final Prep
Dry thoroughly: Allow 24–48 hours of dry weather. Use a moisture meter if possible; target 12–15% moisture content or less before staining. If you don’t have a meter, tape a 12-inch square of plastic to the deck for a few hours; condensation indicates lingering moisture.
Light sanding: Cleaning raises the grain, especially if pressure washing was used. Knock down fuzz and high spots with 80-grit on field boards and 100–120 on rails and handrails. Sand with the grain and vacuum up dust.
Fasteners and repairs: Recess popped nails or screws, replace damaged boards, and ensure gaps are clear for drainage. Avoid filling expansion gaps with caulk; deck boards need to move and shed water.
Clean the dust: Finish by blowing or vacuuming the surface and giving a quick wipe with a slightly damp, lint-free cloth along handrails and caps.
Pressure Washing: Do’s and Don’ts
Do: Use wide tips (25–40°), moderate pressure, and keep the wand moving with overlapping passes. Practice on a scrap or hidden area first.
Don’t: Etch the wood with high PSI, get too close, or stop in one spot. Avoid turbo nozzles on softwood. If you raise fibers, plan an extra pass with 80-grit sandpaper afterward.
Common Mistakes to Avoid
Rushing the dry time: Staining damp wood traps moisture and leads to peeling.
Skipping the brightener: After alkaline cleaning, brightening improves color consistency and adhesion.
Overreliance on bleach: Use it strategically to remove mildew, not as a cure-all. Overuse can degrade lignin and harm nearby vegetation.
Ignoring weather: Rain within 24 hours of cleaning or staining can undo your hard work.
Uneven application: Inconsistent dwell times or missed spots lead to blotchy results—work in organized sections.
Quick FAQs
Can I just pressure wash without chemicals?
Light dirt may come off, but you typically won’t fully kill or remove mildew or spores without a cleaner. Plus, chemicals help lift stains at lower PSI, reducing wood damage.
Is vinegar a good deck cleaner?
White vinegar can help with mild odor or surface film, but it’s not as effective on heavy organic staining or graying. For reliable results, use oxygen bleach and follow with a brightener.
Do I need to sand after cleaning?
Light sanding is recommended to smooth raised grain and improve feel. It also removes any remaining fuzz from pressure washing.
How long after cleaning can I stain?
Generally 24–48 hours of dry conditions, or until the wood is at 12–15% moisture content. Cooler, shaded decks may need extra time.
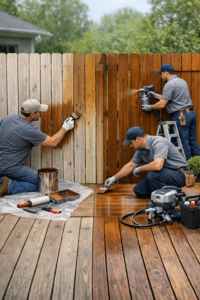
Applying These Steps to Fences and Other Surfaces
Fence Prep Stain Essentials
The same principles apply to a fence prep stain project: clear debris, pre-wet, clean, brighten, dry, and then stain. On vertical surfaces, work from bottom up when applying cleaner to minimize streaking, then rinse from top down. Use gentler pressure (often 500–800 PSI) and pay close attention to rinse time so chemicals don’t drip and dry unevenly. A light sand on rough spots and full drying time will set your fence up for a smooth, even finish.
Pro Deck Cleaning Tips Recap
Deck cleaning tips for best-in-class results:
Test first: Try cleaners on a hidden area for dwell time and color.
Work cool and shaded: Solutions stay active longer and clean more evenly.
Neutralize: Always follow alkaline cleaners with a brightener/neutralizer.
Rinse thoroughly: Clear runoff and check that rinse water runs clean.
Verify dryness: Use time and a moisture check before staining.
Smooth the surface: A quick sand enhances feel and stain uniformity.
Follow these deck cleaning tips, and you’ll have a cleaner, brighter deck that takes stain beautifully and stays that way longer.
Ready to Stain
Once the deck is clean, brightened, and dry, choose a quality stain suited to your wood type and exposure. Penetrating semi-transparent stains excel on many decks because they highlight grain while offering UV protection. Apply thin, even coats and back-brush to eliminate lap marks. Always follow the manufacturer’s spread rate and recoat windows for a durable, uniform finish.
Conclusion: Prep Well, Stain Once
A stunning, long-lasting finish starts with meticulous cleaning and prep. When you remove grime, neutralize the surface, and allow proper dry time, stain goes on smoothly, looks richer, and endures. Ready to transform your outdoor space? Start with these proven steps to remove mildew, brighten your boards, and