
How to Achieve a Rustic Look with Fence and Deck Staining
Craving that timeworn charm that makes outdoor spaces feel instantly welcoming? With the right approach, you can transform a plain fence or deck into a character-rich showpiece that looks like it has weathered gracefully for years. This guide walks you through proven rustic stain techniques, smart prep, and product choices to create a convincing weathered wood finish using durable, natural wood stains designed for exterior use.
Why Rustic Appeal Works Outdoors
The rustic look softens hard edges and helps new builds blend into their surroundings. It highlights grain, embraces imperfections, and echoes the quiet patina of aged timber. Done well, a rustic treatment looks organic instead of “painted on,” complements landscaping, and enhances curb appeal without endless maintenance.
Choose the Right Wood and Stain Type
Understand Your Wood Species
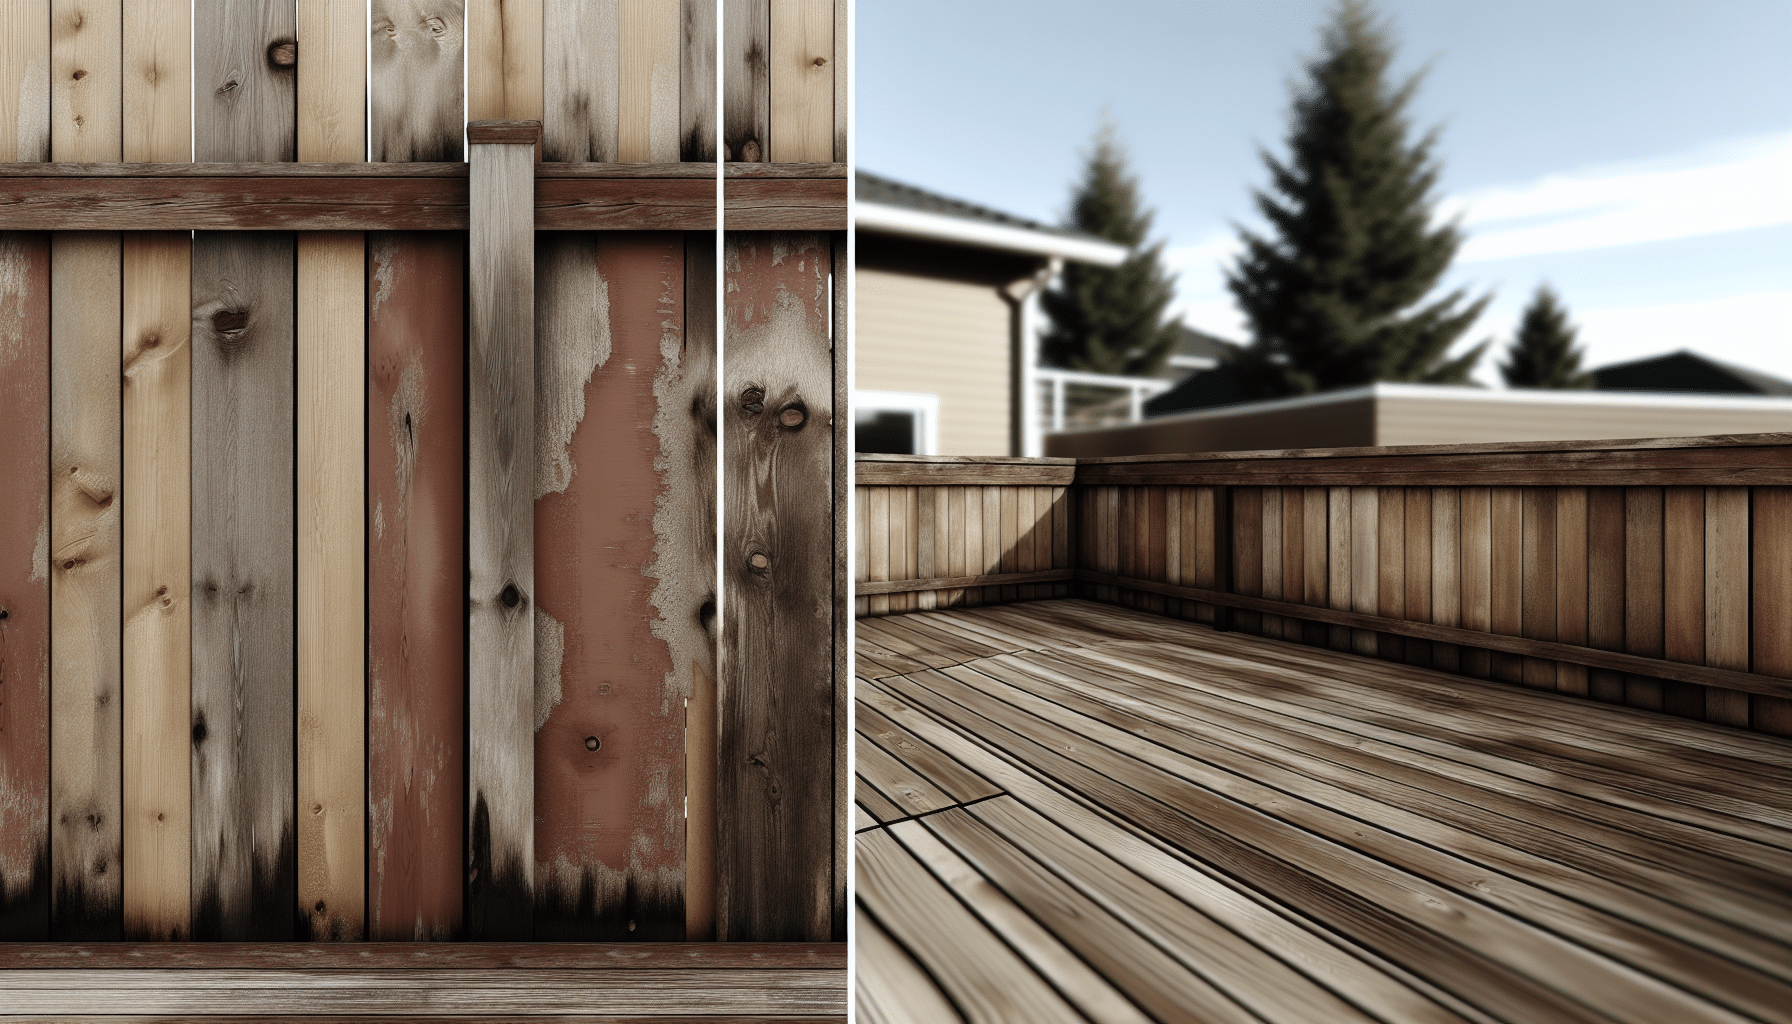
Different woods age differently. Cedar and redwood have natural oils and tannins that respond beautifully to greys and browns, making a weathered wood finish easy to achieve. Pine and spruce take stain readily but can blotch unless you pre-condition or use gel/toning layers. Pressure-treated lumber must dry to under 15–18% moisture content before staining; otherwise, your finish will lift and fade prematurely.
Pick Exterior Stain Families That Fit the Look
For a rustic effect, focus on penetrating finishes that highlight grain:
Semi-transparent and semi-solid stains: Great for layering subtle, natural tones while protecting from UV. Semi-transparents show more grain; semi-solids mute variations for a richer, barnwood effect.
Oil-modified or true oil stains: Penetrate deeply and are easy to maintain with wash-and-recoat cycles. Look for UV absorbers and mildewcides for decks and fences.
Water-based acrylic stains: Fast-drying, color-stable, and lower odor. Modern formulas can produce convincing rustic tones and are ideal where drying windows are short.
Gel stains and glazing tints: Useful for targeted darkening in knots, edges, and low spots to simulate age.
Reactive “aging” solutions: Vinegar-and-steel-wool (iron acetate) or tannin-boosted teas react with wood chemistry to create authentic grey-brown shifts. Seal these properly to lock in color.
Whichever path you choose, prioritize natural wood stains in hues that mimic sun, rain, and time: driftwood greys, silvered browns, muted charcoals, and warm, smoked ambers.
Create a Cohesive Rustic Palette
A convincing patina rarely comes from one color. Combine a cool grey base with a warmer brown toner, or vice versa. Test combinations on scrap boards or hidden sections. For fences, slightly lighter tones read better at a distance. For decks, lean a bit darker for practicality and scuff-camouflage.
Prep Is Everything
Clean, Strip, and Brighten
Start by washing away dirt, mildew, and old finishes. Use an oxygenated wood cleaner for organic buildup and a dedicated stripper if a previous film-forming finish is present. Rinse thoroughly. Power washing can help, but keep pressure in the 800–1,200 PSI range with a fan tip and maintain consistent distance to avoid furrowing the grain.
Follow with an oxalic-acid brightener to restore color, neutralize cleaners, and open pores for even stain absorption—an essential step before attempting rustic stain techniques that rely on tonal nuance.
Sand and De-Gloss Selectively
Lightly sand high-gloss or mill-glazed surfaces with 80–120 grit to promote adhesion. For rustic texture on softwoods, a quick pass with 80 grit highlights early/latewood contrast. Vacuum or blow off dust thoroughly.
Dry to the Right Moisture Content
Allow wood to dry 24–72 hours after washing (longer in humid climates). Verify with a moisture meter; aim for under 15% for oil-based and under 12% for most water-based stains. Rushing this step is the number-one cause of premature failure.
Essential Rustic Stain Techniques for a Weathered Wood Finish
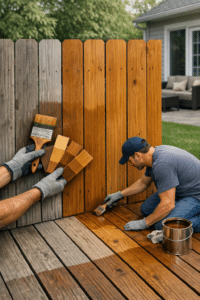
1) Layer Semi-Transparent Tones
Apply a medium-light base coat in a cool grey or driftwood tone. Once dry, add a semi-transparent brown or taupe toner selectively: deepen corners, end grain, and board edges. Feather transitions with a dry brush for a gradual, timeworn shift. This two-tone approach produces a layered weathered wood finish that feels authentic.
2) Dry Brushing to Accentuate Grain
With a nearly dry brush loaded lightly with a darker gel stain or glaze, skim the surface to kiss only the high ridges of grain. This adds visual depth and simulates years of gentle abrasion. Keep strokes long and follow the grain; wipe back if an area becomes too heavy.
3) Wire Brushing and Edge Softening
On select boards, a light wire brushing lifts soft grain, creating texture that catches stain differently—key for a natural, rustic read. Slightly round board edges with 120 grit to mimic wear where hands and feet would naturally pass.
4) Reactive Aging with Iron Acetate
Soak steel wool in white vinegar for 24–48 hours to create iron acetate. Brush on a strong black tea (tannin) prewash, let dry, then apply the iron solution. The wood will shift from warm to silver-brown within minutes to hours. Seal with a clear or lightly toned exterior finish to stabilize color. Always test reactions; species, age, and tannin levels vary widely.
5) Limewash and Pickled Effects
For coastal farmhouse vibes, thin a white or light grey stain to a wash. Brush on, then wipe along the grain, letting pigment settle in low spots. The result is a soft, chalky veil over wood tone, especially striking over wire-brushed decks and fences.
6) Spot Aging and “Sun Bleach” Highlights
Lightly sand select high-traffic areas after the base coat to reveal hints of raw wood, then apply a diluted grey toner. This creates bright, sun-faded streaks that sell the illusion of age without sacrificing protection.
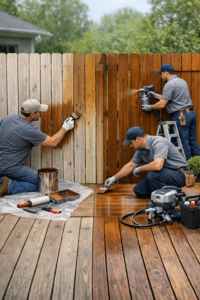
Application Walk-Through: Fences
Step 1: Mask and stage. Protect masonry, plants, and hardware. Work on overcast days or shade-side to maintain a wet edge.
Step 2: Spray and back-brush. If using a sprayer, hold 8–12 inches away and apply a light, even coat. Immediately back-brush with a natural bristle (for oil) or synthetic (for water-based) brush to drive stain into grain and prevent lap marks.
Step 3: Layer for depth. Once the base is dry, selectively tone rails, posts, and board bottoms with a slightly darker semi-transparent or gel stain. Feather transitions to avoid hard lines.
Step 4: Detail knots and end grain. Dab a touch of deeper color into knots and end cuts, then wipe outward. This micro-contrast is what makes rustic finishes look convincing.
Step 5: Seal and even sheen. If you used reactive effects or heavy toning, lock the look with a breathable, UV-resistant clear or lightly toned topcoat compatible with your stain system.
Application Walk-Through: Decks
Step 1: Work in boards, not squares. Start at a board end and coat the full length to avoid lap marks. Keep a paint pad or brush handy to cut into seams and between boards.
Step 2: Control film build. For deck traffic surfaces, avoid thick, film-forming layers. Two thin, penetrating coats beat one heavy coat for longevity and slip resistance.
Step 3: Create subtle variation. After the first coat cures, introduce a slightly different tone in select boards or along the outer edges using a diluted gel stain, then back-brush to blur edges. The goal is gentle variety—no zebra stripes.
Step 4: Finish with a protective toner. A final pass of a UV-rich, semi-transparent in your base tone pulls the look together while improving weather resistance.
Common Mistakes to Avoid
Overpower washing: Excess pressure tears fibers and causes fuzzy grain that stains blotchy. Gentle, consistent technique wins.
Skipping brightener/neutralizer: Cleaners raise pH; brighteners restore balance so stain sets evenly.
Not testing first: Wood, climate, and products interact uniquely. Always create a sample board that includes your full stack: cleaner, brightener, base stain, toners, and sealer.
Too dark, too fast: Rustic doesn’t mean opaque. Build depth gradually with translucent layers.
No back-brushing: Sprayed stains left unworked can flash, stripe, or sit on the surface instead of penetrating.
Improper conditions: Ideal temps are typically 50–90°F with low wind and stable shade. Hot sun flashes solvents and causes lap marks.
Ignoring safety: Oil-soaked rags can self-ignite. Lay flat to dry on a non-combustible surface or submerge in water and dispose per local guidelines. Wear gloves, eye protection, and a respirator as recommended.
Protect and Maintain the Patina
Lock in your weathered wood finish with a breathable, UV-resistant topcoat or periodic reapplication of your chosen stain. Rustic looks improve with gentle wear, but UV and moisture are relentless. Plan a seasonal routine: rinse off pollen and dust, wash yearly with an oxygenated cleaner, and recoat high-traffic areas every 18–36 months depending on exposure.
Choose maintenance-friendly systems. Penetrating natural wood stains allow straightforward refreshes without aggressive stripping—ideal for keeping your rustic character intact over time.
Recommended Tools and Products
Have these on hand before you start:
Prep: Oxygenated wood cleaner, stripper (if needed), oxalic-acid brightener, nylon or brass brush, 80–120 grit sandpaper, moisture meter.
Application: Quality brushes (natural for oils, synthetic for water-based), stain pad, low-pressure sprayer, buckets, rags.
Finishes: Semi-transparent or semi-solid exterior stain in driftwood/grey/brown tones, gel stain or glazing tint for accents, reactive iron acetate or tannin tea (optional), compatible clear or lightly toned topcoat with UV inhibitors.
When in doubt, opt for exterior-rated, low-VOC natural wood stains from reputable brands and stick to a single system (cleaner, stain, and sealer designed to work together) to avoid compatibility problems.
Sample Recipes for Convincing Rustic Results
Silvered Barnwood: Base coat driftwood grey semi-transparent; dry brush warm brown gel into knots and edges; final tonal pass with a lighter grey to unify.
Coastal Weathered: Wire brush; reactive iron acetate over tea; seal with a clear matte; add a diluted white wash to low spots for chalky highlights.