
How to Test Wood Moisture Levels Before Staining
Staining a fence, deck, pergola, or other exterior wood surface can dramatically improve its appearance and help protect it from weather damage. But even the best stain will struggle if it is applied at the wrong time. One of the most overlooked steps in any wood finishing project is checking moisture content first. Before opening a can of stain, it is essential to know whether the wood is actually dry enough to absorb and hold the finish properly.
A proper wood moisture test helps prevent peeling, blotchy color, poor absorption, and premature coating failure. Whether you are handling fence prep staining for a new installation or restoring an older deck, understanding moisture levels can save time, money, and frustration. With the right approach and the right deck moisture tools, you can stain with confidence and get a more durable, professional-looking result.
Why Wood Moisture Matters Before Staining
Wood is a porous, natural material that constantly reacts to its environment. It absorbs and releases moisture depending on humidity, rainfall, direct sun, and temperature. If you stain wood while it still holds too much moisture, the stain may not penetrate correctly. Instead of bonding with the wood fibers, the product can sit on the surface, leading to uneven drying and early failure.
When wood is too wet before staining, common problems include:
Reduced stain absorption: Excess water blocks the wood pores, making it hard for the stain to soak in evenly.
Patchy appearance: Wet spots absorb stain differently than dry spots, creating inconsistent color.
Peeling or flaking: If the finish cannot bond properly, it may lift as the wood expands and contracts.
Mildew risk: Trapped moisture beneath a coating can create conditions for mold or mildew growth.
Shorter coating life: Even if the stain looks acceptable at first, it often wears out faster when applied to damp wood.
That is why moisture testing should be a routine part of fence prep staining and deck refinishing. Dry-looking wood is not always dry enough. The surface may feel ready while the inner fibers still hold too much moisture.
What Moisture Level Is Safe for Staining?
In most cases, wood should have a moisture content below 15% before staining, though many stain manufacturers recommend aiming for 12% or lower for the best results. Always check the label or technical data sheet for the product you plan to use, since acceptable ranges can vary.
As a general rule:
Below 12%: Usually ideal for staining.
12% to 15%: Often acceptable, depending on the product and weather conditions.
Above 15%: Usually too wet for reliable stain performance.
Keep in mind that pressure-treated lumber, newly installed fencing, and recently washed decks often take much longer to dry than homeowners expect. Wood that has been exposed to rain, sprinklers, or humid conditions may also need extra time.
When Should You Test Wood Moisture?
You should perform a wood moisture test any time there is a chance the wood may have retained water. Important times to test include:
After new wood installation: Fresh lumber, especially pressure-treated wood, can be too wet for immediate staining.
After rain: Even if the top layer appears dry, deeper moisture may still be present.
After cleaning or power washing: Washing a fence or deck is a smart preparation step, but it adds moisture that must fully evaporate.
Before seasonal staining projects: Spring and early summer often bring fluctuating moisture conditions.
When boards are shaded: Areas under trees or on the north side of the home may dry more slowly than sun-exposed sections.
For the best results, test moisture shortly before staining rather than guessing based on how many days have passed since rain or washing.
Best Tools for Testing Wood Moisture
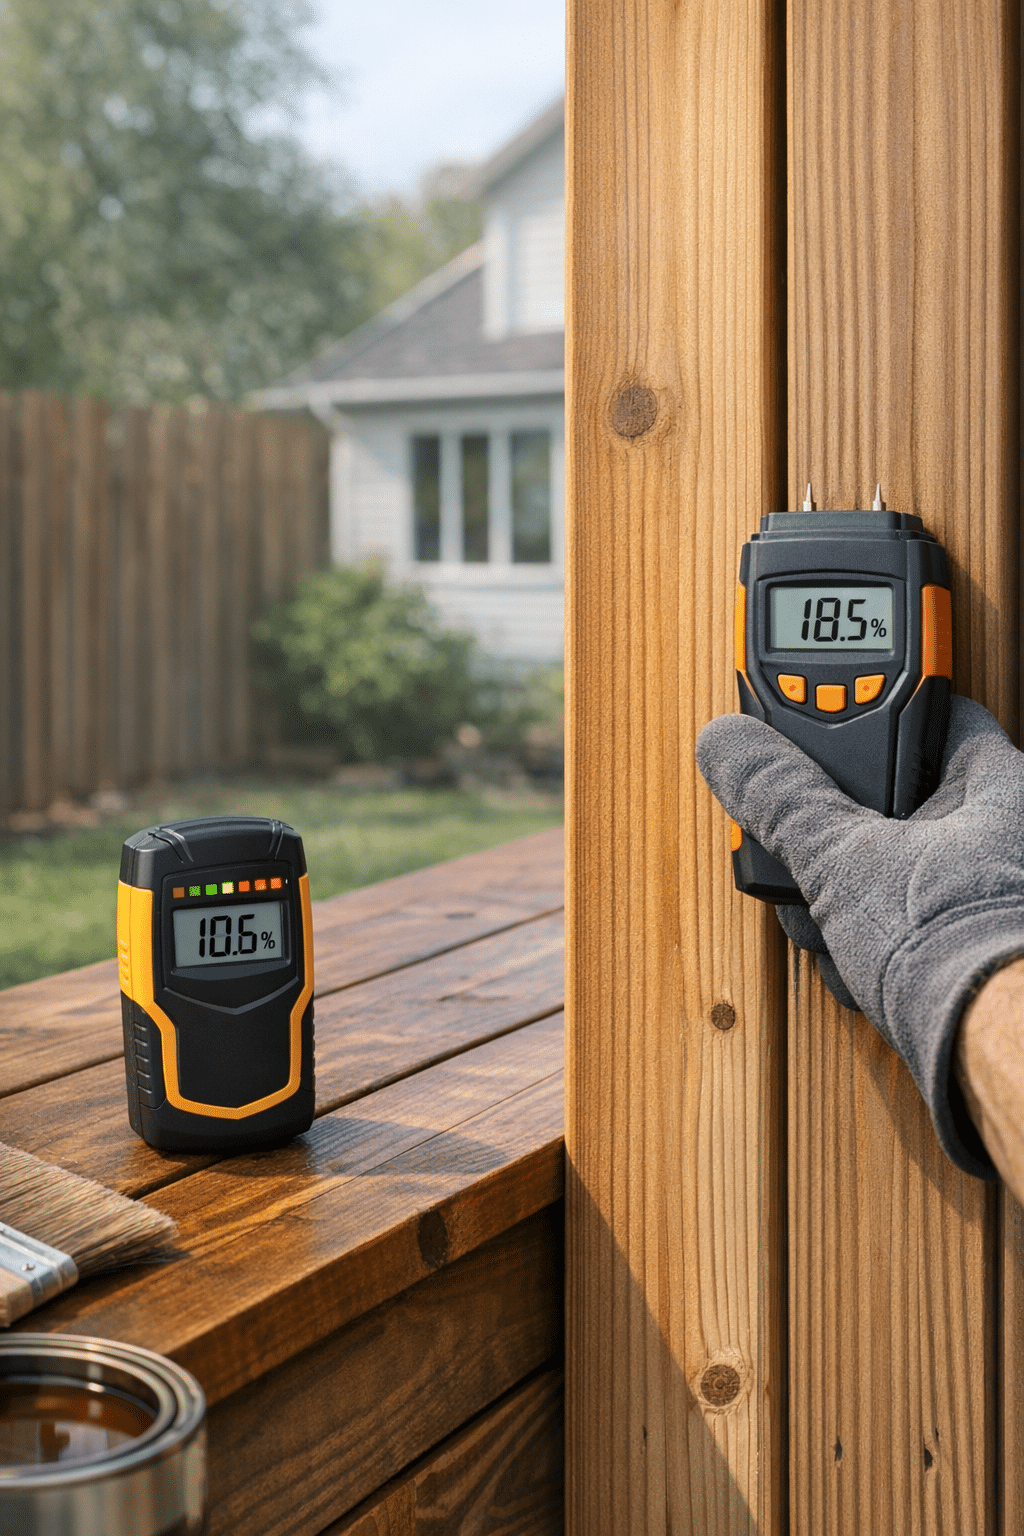
The most reliable way to measure wood moisture is with a moisture meter. These practical deck moisture tools provide a reading that helps you decide whether the wood is ready for stain.
1. Pin-Type Moisture Meters
Pin-type meters use two small metal probes that penetrate the wood surface. The tool measures electrical resistance between the pins, which changes based on moisture content.
Pros:
Highly accurate when used correctly
Can measure below the surface
Good for targeted spot checks
Cons:
Leaves tiny pinholes in the wood
Requires direct contact and consistent depth
Pin meters are often a great option for homeowners who want precise readings during fence prep staining or deck restoration projects.
2. Pinless Moisture Meters
Pinless meters use sensors to scan the wood without puncturing it. You press the meter against the surface, and it reads moisture levels below the top layer.
Pros:
No holes left behind
Fast for scanning larger areas
Convenient for decks, fences, and siding
Cons:
Can be affected by wood density or thickness
May cost more than basic pin meters
For larger projects, pinless models are among the most efficient deck moisture tools because they allow you to check multiple boards quickly.
3. Manufacturer Moisture Guidelines
While not a measuring tool, the stain manufacturer’s instructions are important. Once you get a reading from your meter, compare it to the product’s recommended moisture range. A good reading only matters if it aligns with the stain’s requirements.
How to Perform a Wood Moisture Test Correctly
Using moisture meters is simple, but good technique matters. Follow these steps to improve accuracy before staining.
Step 1: Choose Multiple Test Areas
Do not rely on a single reading. Moisture can vary across the surface based on shade, board spacing, airflow, and previous water exposure. Test several areas, including:
Horizontal deck boards
Steps and railings
Fence posts and pickets
Shaded sections
Boards near the ground
Areas that were recently cleaned or splashed
This is especially important during fence prep staining, since posts and lower boards often dry more slowly than upper sections.
Step 2: Check the Surface Is Clean
Dirt, stain residue, and debris can affect readings or interfere with sensor contact. Sweep or brush the wood first. If you have recently cleaned the wood, make sure standing water is completely gone.
Step 3: Follow the Meter Instructions
Each meter is slightly different. Some require wood species settings for greater accuracy. If your tool includes species correction, choose the closest match to your lumber type. This matters because different wood species conduct moisture differently.
Among professional-grade deck moisture tools, this species setting is often one of the features that improves measurement accuracy.
Step 4: Take Several Readings Per Section
Place the meter on or in the wood according to the tool’s instructions and record several readings in each section. If numbers vary, use the higher reading as your guide. It is better to wait a little longer than to stain too soon.
Step 5: Test More Than the Sunniest Spots
Sun-exposed boards may be dry while shaded or dense pieces still hold moisture. For a trustworthy wood moisture test, include the most moisture-prone areas, not just the places that seem ready.
Step 6: Compare Results to Staining Recommendations
Once most readings fall within the safe range recommended by the stain manufacturer, the wood is generally ready. If readings are still too high, allow more drying time and test again later.
How Long Should Wood Dry Before Testing?
There is no universal drying timeline because wood moisture depends on weather, wood species, ventilation, board thickness, and previous treatment. Still, these rough guidelines can help:
After rain: Wait at least 24 to 48 hours of dry weather before testing.
After power washing: Wait 48 hours or longer, depending on humidity and sun exposure.
New pressure-treated wood: Drying can take weeks or even months before staining readiness is reached.
Freshly installed fencing or decking: Always test rather than assuming it is ready.
Remember, time alone is not proof. A moisture meter gives you a real answer. That makes deck moisture tools much more dependable than guesswork.
Common Mistakes to Avoid
Skipping the Moisture Test
The biggest mistake is assuming the wood is dry because it looks dry. Surface appearance does not reveal internal moisture levels.
Testing Only One Board
One dry board does not mean the entire deck or fence is ready. A complete wood moisture test should include multiple sections.
Ignoring Recent Weather
Morning dew, overnight humidity, and sprinkler overspray can all affect moisture content, even without rain.
Staining Pressure-Treated Wood Too Early
This is a common issue in fence prep staining. New pressure-treated lumber often contains enough moisture to delay staining for an extended period.
Using the Wrong Tool or Settings
If your meter has species settings or calibration instructions, use them. Better readings lead to better staining decisions.
Extra Tips for Better Fence and Deck Staining Results
Moisture testing is critical, but it works best as part of a complete prep process. To improve final results:
Clean the wood first: Remove dirt, mildew, and old failing finish so the stain can penetrate evenly.
Watch the forecast: Choose a period with dry weather before and after application.
Stain in moderate temperatures: Extreme heat can cause stain to dry too quickly, while cool, damp weather slows curing.
Use quality products: High-quality stain and dependable deck moisture tools work together for better long-term performance.
Follow label directions: Application method, recoat timing, and moisture limits vary by brand and formula.
Is the Water Drop Test Enough?
Some homeowners use a simple water drop test, where they sprinkle a few drops of water on the wood to see if it beads up or absorbs. This can offer a basic clue about whether the wood surface is porous, but it is not a reliable substitute for a true wood moisture test.
The water drop method says more about surface absorption than internal moisture content. A board may absorb droplets and still be too wet inside for staining. If you want dependable results, especially for major fence prep staining or deck refinishing, a moisture meter is the better choice.
Final Thoughts
Testing wood moisture before staining is one of the smartest steps you can take to protect your project. It helps you avoid coating failure, uneven color, and wasted materials while giving your stain the best chance to perform as intended. Whether you are preparing a backyard fence or refinishing a weathered deck, using reliable deck moisture tools and performing a proper wood moisture test can make a major difference in the final outcome.
Do not rush the process. Let the wood dry, test it carefully, and stain only when conditions are right. If you want better, longer-lasting results from your next fence prep staining or deck project, start with moisture testing and finish with confidence.