How to Safely Remove Old Stain Before Applying New
A flawless, long-lasting finish starts long before you open a new can of stain. The key is safe, effective stain removal that clears away weathered coatings, dirt, and mildew so your next application bonds and looks its best. Whether you’re refreshing a deck, restoring a fence, or reviving outdoor furniture, the right prep protects your wood and elevates results. This guide walks you through proven deck stripping methods and fence stain prep techniques—from diagnosis to cleanup—so you can work efficiently and safely.
Why Removing Old Stain Matters
New stain can only perform as well as the surface beneath it. If the previous finish is peeling, glossy, contaminated, or too thick, the new coat may fail early by flaking, blotching, or fading unevenly. Thorough stain removal ensures:
Better adhesion: Clean, properly profiled wood allows fresh stain to penetrate and lock in.
Truer color: Old pigments can skew new color. Removing them lets your chosen shade come through accurately.
Even absorption: Eliminating residues reduces lap marks, blotches, and shiny/flat mismatches.
Longer lifespan: A sound base helps your finish resist UV, moisture, and wear for more seasons.
Safety First: PPE and Site Protection
Effective stain removal is safe stain removal. Before you begin, gather protective gear and shield nearby areas to prevent damage.
Personal protective equipment (PPE): Chemical-resistant gloves, splash goggles, long sleeves, and a respirator rated for organic vapors when using strippers. Closed-toe shoes with good traction help on wet surfaces.
Ventilation: Work outdoors or with ample airflow. Avoid enclosed areas where fumes can accumulate.
Surface and landscape protection: Pre-wet plants, cover shrubs with breathable tarps, and mask hardware, glass, and adjacent siding. Divert runoff away from gardens and storm drains.
Test first: Always spot-test products in an inconspicuous area to confirm effectiveness and check for color changes.
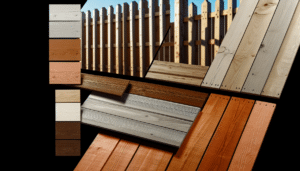
Diagnose the Existing Finish and Wood
Correct diagnosis saves time and effort. Not all coatings or woods respond the same way to deck stripping methods or cleaners.
Identify the existing finish
Transparent or semi-transparent stain: Penetrates the wood; typically removed with oxygenated cleaners or mild to moderate strippers, light pressure washing, and limited sanding.
Semi-solid or solid stain: More pigment and often film-forming. Usually requires stronger strippers, longer dwell times, and more thorough rinsing—with follow-up sanding for stubborn areas.
Paint-like coatings: Thick, fully film-forming products may need heavy-duty chemical strippers or mechanical removal with sanding. Consider whether complete removal is feasible or if replacement boards are more efficient.
Know your wood species
Softwoods (pine, cedar, redwood): Easily damaged by high pressure. Use low PSI and gentle brushwork.
Hardwoods (ipe, teak, mahogany): Dense and oil-rich. Often need a quality stripper and brightener to open pores for new stain.
Weathered or gray wood: UV damage can raise grain. Plan for light sanding after cleaning to smooth the surface.
Choosing the Right Stain Removal Method
There’s no single best solution. The ideal approach balances effectiveness, safety, wood protection, and environmental responsibility. Consider these proven options.
Chemical strippers: The workhorse of deck stripping methods
Oxygenated cleaners (sodium percarbonate): Great for cleaning and breaking down light, failing stains plus mildew. They are low-odor and biodegradable. Follow with a wood brightener to neutralize and restore color.
Alkaline strippers (sodium or potassium hydroxide): Effective on stubborn semi-solid and solid stains. They soften coatings for easier removal. Because they raise pH, always follow with an oxalic acid brightener to neutralize and prevent fuzzing.
Solvent or specialty gel strippers: Useful on verticals and thick build-up where dwell time matters. Choose low-VOC options when possible and observe all safety warnings.
Key tips: Work in the shade and keep the surface wet during dwell so the product stays active. Do not let strippers dry on wood.
Power washing: Effective when done correctly
Pressure washing can speed stain removal, but technique is everything.
PSI and tips: Use 500–800 PSI for softwoods and 800–1200 PSI for hardwoods with a 25°–40° fan tip. Maintain 6–12 inches from the surface and move with the grain.
Motion and overlap: Sweep steadily with consistent distance to avoid stripes or gouges. Overlap each pass by one-third.
Rinse thoroughly: After chemical dwell, rinse from bottom to top to prevent streaking, then finish with a top-to-bottom rinse.
Sanding and mechanical removal
Sanding excels at removing residual stain and smoothing raised grain after washing. For decks, start around 60–80 grit; for fences and rails, 80–100 grit. Avoid polishing the surface too smooth (over 120 grit) which can impede stain penetration. Use a random-orbit sander for flat boards and sanding sponges for edges and spindles.
Eco-conscious approaches
Where possible, choose biodegradable cleaners, capture runoff, and avoid harsh products near waterways. Oxygenated cleaners combined with moderate pressure and brighteners can deliver excellent stain removal with a smaller environmental footprint.
Step-by-Step: Safe Stain Removal for Decks and Fences
1) Prep the workspace
Remove furniture and fixtures. Sweep off debris. Pre-wet surrounding plants, cover delicate areas, and set up containment to direct rinse water to soil—not drains. For fence stain prep, work in manageable sections to maintain control over dwell and rinse times.
2) Wet the wood and apply stripper or cleaner
Lightly wet the surface to prevent flash drying, then apply your chosen product generously with a pump sprayer or brush. For verticals during fence stain prep, start at the bottom and work up to minimize streaking. Observe manufacturer dwell times—commonly 5–30 minutes. Keep the surface wet and agitate with a stiff synthetic brush to help lift pigment and fibers.
3) Rinse methodically
Use low to moderate pressure. Work with the grain and rinse thoroughly until runoff is clear. Avoid lingering in one spot to prevent etching. Check that the old stain is fully removed; reapply stripper to stubborn areas and repeat as needed.
4) Neutralize and brighten
After alkaline strippers, apply a wood brightener (typically oxalic or citric acid) to bring pH back to neutral and restore natural color. This step also helps remove iron and tannin discoloration, minimizing blotchiness in the new finish. Even when using oxygenated cleaners, brighteners refine the surface for superior results.
5) Allow proper drying
Let the wood dry thoroughly—usually 24–48 hours in mild conditions and up to 72 hours in humid or cool weather. Aim for moisture content under 15% before staining. If you have a moisture meter, test multiple boards; if not, err on the side of longer drying time.
6) Final sanding and dust removal
Lightly sand high-traffic zones, handrails, and any raised grain. Feather edges where a few spots retained color so the surface looks uniform. Vacuum and tack-cloth dust to ensure the new stain penetrates evenly.
Special Cases and Pro Tips
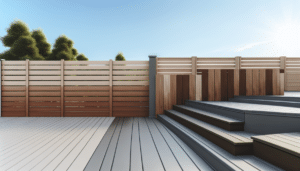
Fence stain prep essentials
Fences often have weathered vertical boards and hidden fasteners. For efficient fence stain prep:
Work in vertical sections: Keep dwell times consistent to prevent streaks.
Watch nails and brackets: Mask or clean corrosion with a metal-safe cleaner to avoid black streaks on fresh stain.
Mind overspray: Use cardboard shields when spraying cleaners or rinsing near neighboring properties.
Solid stains and paint-like coatings
These require more aggressive deck stripping methods. Expect multiple stripper applications, extended dwell, and thorough rinsing. If heavy build-up remains despite best efforts, targeted sanding or board replacement may be more time- and cost-effective.
Hardwood decks
Dense hardwoods like ipe resist penetration when pores are clogged. Use a quality stripper followed by brightener, then allow extended drying. Choose an oil-based, penetrating stain designed for hardwoods to maximize longevity.
Mildew and algae
If you see black or green growth, incorporate an oxygenated cleaner (sodium percarbonate) to lift biofilms. Avoid straight household bleach on bare wood; it can damage lignin and cause premature greying if not properly neutralized and rinsed.
Common Mistakes to Avoid
Too much pressure: Gouging fibers with high PSI creates furry, damaged wood that stains poorly.
Skipping neutralization: Leaving a high-pH surface after strippers can cause adhesion issues and uneven color.
Insufficient drying: Trapped moisture leads to blotches and premature failure. Wait for a favorable weather window.
Over-sanding: Polishing the surface makes it too slick for penetration. Stop at 80–100 grit for most exterior projects.
Staining in harsh sun: Quick-drying conditions create lap marks. Work in shade or cooler parts of the day.
Cleanup, Disposal, and Environmental Care
Capture and dispose of residues responsibly. Avoid washing chemicals into storm drains. Absorbent berms, tarps, and wet-dry vacs help manage runoff. Follow local regulations for chemical disposal, and rinse equipment on gravel or soil where water can percolate, not flow directly to waterways. Protect plants by rinsing them again with fresh water after you finish.
Readiness Check Before Applying New Stain
Use this quick checklist to confirm you’re ready for a perfect finish:
Old stain removed: The surface looks uniformly bare, with only slight shadowing at most.
Neutralized and brightened: Color is even, and pH is back to neutral.
Dry and clean: Moisture content is below 15% and surfaces are dust-free.
Weather window: No rain forecast for 24–48 hours and temperatures within the stain manufacturer’s recommended range.
Right product, right method: Choose a stain suited to your wood species and exposure, and follow spread rates to avoid over-application.
Frequently Asked Questions
Do I have to remove all the old stain?
For transparent and semi-transparent products, remove as much as possible for even absorption. Solid stains typically require near-total stain removal, especially if peeling or thick. Remaining glossy or intact areas should be scuffed at minimum to ensure adhesion.
Can I skip chemical strippers and just sand?
On small areas, sanding can work—but it’s labor intensive and may leave embedded pigments. A combined approach—cleaner or stripper, low-pressure rinse, then light sanding—