
How to Deal With Common Staining Problems Like Blotches and Streaks
Uneven stain, blotches, and streaks can turn an otherwise promising project into a frustrating redo. The good news: there are reliable DIY techniques and pro-level methods to correct the problem and prevent it in the future. Whether you’re trying to fix blotchy stain on pine shelves or tackling streak removal on a large tabletop, this guide walks you through practical stain troubleshooting from diagnosis to solution.
Why Stains Turn Blotchy or Streaky
Understanding the cause is half the cure. Most uneven results come down to one or more of the following:
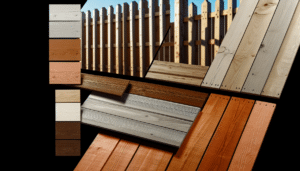
1) Uneven wood density and figure: Blotch-prone species like pine, fir, alder, birch, and maple have areas that absorb stain at different rates, causing dark patches (blotches) beside pale zones.
2) Incomplete prep: Skipping grits, sanding through, or leaving glue squeeze-out and mill glaze create spots that either absorb too much or too little stain.
3) Product mismatch: Using a thin wiping stain on uneven woods without a conditioner, or using fast-drying water-based stain in hot/dry conditions, can cause lap marks and streaks.
4) Application errors: Working too slowly, overlapping partially dried areas, or wiping inconsistently can telegraph into streaks and cloudy patches.
5) Environmental factors: Heat, low humidity, and airflow accelerate drying, shrinking your “wet edge” time and amplifying streaking and lap marks.
Quick Diagnosis: Stain Troubleshooting Checklist
Identify the defect before you fix it
Blotches: Random dark splotches adjacent to lighter areas, often in softwoods or figure like curl/birdseye. Usually absorption-related.
Lap marks/streaks: Distinct lines or bands where one section overlapped and dried before the next was applied. Common with fast-drying stains or large surfaces.
Brush marks/drags: Directional lines from thick product or a dry brush. Often appear with gel stains or heavy-bodied finishes.
Swirl marks: Circular patterns visible after staining, typically from sanding with too coarse a grit or skipping grits.
Once you know what you’re seeing, you can choose the most efficient path to fix blotchy stain or perform targeted streak removal without overworking the surface.
Immediate Fixes: How to Fix Blotchy Stain Without Starting Over
You don’t always need to strip and start again. Try these progressive approaches, beginning with the least invasive.
1) Rewet and blend
If the stain is still open (tacky but not fully dry), rewet the area with a small amount of the same stain or compatible solvent (per the product’s instructions). Work from the light area into the dark, then wipe the entire panel in one, consistent pass with the grain. This can soften edges and blend minor streaks.
2) Feather with additional stain
After the initial coat has dried, apply a light touch-up coat only to the pale zones to even them out, then immediately wipe the whole surface. Use minimal product—this is a subtle blend, not a second full coat.
3) Glaze with gel stain
Gel stain makes an excellent “glaze” for controlled color correction. Lightly scuff with a fine abrasive (320–400 grit or a gray pad), then apply a thin gel stain layer and wipe to taste. This reduces contrast in blotches and can smooth banding. Finish with a clear topcoat to lock it in.
4) Tone with dye or a shaded clear
For widespread unevenness, apply a transparent dye or a lightly tinted clear coat (a “toner”). This layers uniform color over the whole surface, visually compressing highs and lows. Use multiple super-thin passes rather than one heavy coat to avoid muddiness.
5) Rubbing out to match sheen
Uneven sheen can amplify perceived blotches. After the finish cures, rub out with fine abrasive pads or compounds to achieve a consistent luster. While this won’t change color, it reduces glare that highlights blotchy areas.
6) Spot-degloss and recoat
If you have localized streaks under a clear coat, carefully degloss those areas with a fine pad, blend in color using a gel stain or glaze, then recoat the entire surface to even it out.
Streak Removal Techniques
When your primary issue is streaks or lap marks, time and technique matter.
Maintain a wet edge: Work in manageable sections, keeping the leading edge wet and blending into the next section promptly.
Use the right applicator: On large flat areas, a pad applicator or high-quality lint-free cloth often yields smoother results than a brush. For gel products, use a soft foam brush to lay product and a clean rag to wipe uniformly.
Even pressure, consistent wipes: Wipe with the grain using full-length strokes from end to end. Overlapping partial wipes creates bands.
Adjust conditions: If stain is flashing off, increase open time by working in cooler conditions, reducing airflow, or choosing a slower product. Some oil-based stains allow adding a compatible extender; follow manufacturer guidance.
Correcting dried streaks: Lightly scuff with a fine abrasive to knock down ridges, then apply a thin blending coat and wipe promptly. If ridges telegraph through, a more thorough sand-back may be required.
When to Strip and Restart
Sometimes the fastest way to a flawless finish is a reset. Consider a full redo if color variations are extreme, there are deep brush ridges, or multiple fixes have compounded issues.
Step-by-step restart
1) Test first: On a hidden area, trial your chosen stripper or a sand-back to confirm it reaches bare wood without damage.
2) Strip or sand: Chemical strippers can lift heavy color and finishes with less risk of sanding through veneers. If sanding, progress through grits uniformly (120–150–180, optionally 220 on dense hardwoods). Avoid over-sanding edges.
3) Clean and neutralize: Remove residue per product directions. Wipe with mineral spirits or water as appropriate and allow the wood to dry fully.
4) Raise and knock down grain (for water-based): Lightly mist with water, let dry, and sand lightly (220–320) to reduce post-stain fuzz that can look streaky.
5) Pre-condition blotch-prone woods: Use a wood conditioner or washcoat. For oil-based stains, an oil-based conditioner; for water-based stains, a water-based conditioner. Apply evenly and follow the prescribed wait time.
6) Choose the right stain: Gel stains minimize blotching on tricky species. Dyes penetrate evenly and can be layered for tone control. Traditional wiping stains are great on open-grain woods with proper prep.
7) Apply with a plan: Work from panel ends toward the middle, maintain a wet edge, and schedule your sections so each can be wiped before it dries.
8) Lock in with a clear finish: Once color is even, protect it with a compatible topcoat. This evens sheen and adds depth that can further disguise minor variations.
Preventing Blotches and Streaks on Your Next Project
Dial in your sanding
Consistency is everything. Sand all surfaces to the same final grit, and avoid skipping steps. Remove swirl marks completely before staining—use a bright raking light to inspect. On softwoods, stopping at 180 can improve color depth without opening the door to blotches.
Pre-seal problem woods
Softwoods and tight-grained “blotchers” benefit from a conditioner or a thin shellac washcoat. This partially seals thirsty areas so absorption is more uniform, making it far easier to fix blotchy stain before it happens.
Pick the right chemistry
Oil-based wiping stains offer longer open time and fewer lap marks in warm, dry conditions. Water-based stains are low odor and dry fast, but need careful section planning. Gel stains are excellent for verticals and splotchy woods. Match your choice to the project and environment.
Perfect your technique
Load the surface, allow a brief dwell, then wipe evenly with the grain using long, continuous strokes. Don’t spot-wipe late; it creates shiny patches and streaks. On large surfaces like tabletops and doors, work with a partner: one applies, one wipes.
Control the environment
Aim for moderate temperature and humidity. Reduce drafts, avoid direct sun, and consider extenders compatible with your stain. Good lighting helps you catch lap marks before they set.
Test on scrap
Always run a full system test (prep, conditioner, stain, topcoat) on offcuts from the actual project. This is the single best form of stain troubleshooting and can save hours later.
FAQs: Fast Stain Troubleshooting
How do I fix blotchy stain on pine without stripping?
Try a light scuff-sand, then glaze with a gel stain to even color. If needed, tone with a diluted dye or tinted clear. Finish with a protective topcoat. This sequence often resolves mild-to-moderate blotching.
What’s the best method for streak removal on a large tabletop?
Work in halves or thirds, maintain a wet edge, and wipe each section in end-to-end passes with consistent pressure. If streaks have already dried, scuff lightly and apply a thin blending coat, then wipe the entire top in one go.
Can I use a wood conditioner with water-based stains?
Yes—use a water-based conditioner designed for that system. Oil-based conditioners can sometimes repel water-based stains or alter color unpredictably.
Why does my stain look different under the clear coat?
Sheen and clarity affect perceived color. Gloss highlights unevenness; satin or matte diffuses it. A clear coat also adds depth, making colors appear richer or slightly darker. Rub out to a uniform sheen for a more even look.
When should I call a pro?
If you have veneer at risk, antique pieces, or high-visibility surfaces with heavy blotching and embedded ridges, a professional refinish can be faster and safer than multiple DIY attempts.
Bring It All Together
Blotches and streaks are common, fixable, and often preventable. By identifying the specific defect, choosing the least invasive remedy first, and dialing in prep and technique, you can fix blot